Well Planning Using Quarter Sections (Kingdom only)
Quarter sections are a way to locate wells on a map based on an 8 x 8 grid. Using the grid as a frame of reference, you can locate wells by snapping to a location on the quarter section or using one of three manual methods: footages, section corners, or quarter calls. For more information about locating wells, see Locating wells on a quarter section (Kingdom only).
Spatial Explorer provides a set tools on the toolbar for drawing quarter sections and using them to create and locate new wells or relocate existing wells. When you digitize the outside borders of the grid, each of the four sides is divided into 8 segments of equal length, regardless of the length of individual sides. If you draw a square, all the grid lines are parallel and each section is of equal size. If the sides are not of equal length and/or they are not parallel, then the grid will be skewed based on the length and orientation of the sides. Spatial Explorer orients the top of the grid to align with north on the underlying Spatial Explorer map.
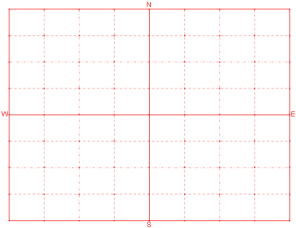
Parallel Quarter Section |
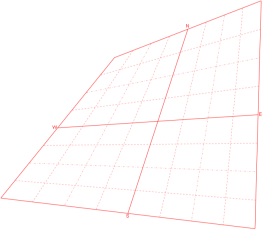
Skewed Quarter Section |
Digitizing quarter sections
You create quarter sections by digitizing them on the Spatial Explorer map or by having Spatial Explorer create one for you automatically. You can only create a quarter section on the currently active layer.
After you create a quarter section you can use it to create and locate a new well on the map or relocate an existing well. You can manually locate wells using the quarter section or have the well location snap automatically to the quarter section grid. You cannot relocate existing wells if the well location is locked. You also cannot relocate existing wells with a deviation survey unless it is a two-point deviation survey.
When you manually create a quarter section by digitizing on the map, you can see the segment length and azimuth at the bottom of the window while you are digitizing. This helps you properly orient and size the quarter section on the map. The size of the quarter section depends on both the scale of the map and how large a quarter section you digitize.
Spatial Explorer can also create quarter sections for you automatically based on lease boundaries. If the active layer has lease boundary polygons, clicking on the lease you want with the quarter section tool selected produces a quarter section that exactly matches the lease boundaries. The lease boundary must be quadrilateral in shape for the automatic quarter section to work.
You have the option to manually or automatically create two concurrent quarter sections. This is useful if you want to create a well with the surface location located in one quarter section and the bottomhole location located in another quarter section. For example, you may have a directional well that crosses lease boundaries.
The well planning toolbar
The well planning toolbar provides options for creating and deleting quarter sections and locating new wells or moving existing wells.
|
Toolbar Icon |
Use |
|---|---|
|
Quarter Sections |
|
|
|
Define a quarter section automatically. |
|
|
Define a quarter section manually (digitize). |
|
|
Delete the quarter section. Deletes both surface and bottomhole quarter sections if you have both. |
|
Create Wells |
|
|
|
Create new well by surface location. |
|
|
Create well by surface and bottomhole location. |
|
|
Create new well by descriptive location. |
|
Move Wells |
|
|
|
Move well by surface location. |
|
|
Move well by bottomhole location. |
|
|
Move well by surface and bottomhole location. |
|
|
Move well by descriptive location. |
|
Other |
|
|
|
Undo previous action. |
|
|
Close the Well Planning toolbar. |


- In the Layers list, make the layer where you want to digitize the quarter section the active layer.
- On the map toolbar, click
 .
. - On the Well Planning toolbar, select
 to begin digitizing a quarter section.
 - On the map, click once where you want to start digitizing, and then click again where you want the first segment of the quarter section to end. By default, the cursor snaps to vertices on any polygons available on the active layer. If you do not want the cursor to snap to vertices, press and hold the Ctrl key. Use the information displayed on the map about segment length and azimuth to assist you as you digitize.
- Click again where you want the second segment of the quarter section to end.
- Click again where you want the third segment of the quarter section to end. Spatial Explorer automatically completes the fourth segment of the quarter section, calculates the 8 x 8 grid, and identifies North, South, East, and West for the quarter section.
- If you want to create a second quarter section (for example, to use for specifying the bottomhole location of a well), then digitize another quarter section. Notice that the second quarter section is a different color than the first (by default the first quarter section is red and the second is blue). Otherwise, go to the next step.
- After you have finished digitizing the quarter section or sections you need, you can now use the quarter section or sections to locate a new well or move an existing well.
- In the Layers list, make the layer where you want to digitize the quarter section the active layer. This layer must contain quadrilateral polygons.
- On the Well Planning toolbar, select
 to create a quarter section.
 - Click within the bounds of the quadrilateral polygon you want to create a quarter section for.
- Spatial Explorer automatically creates a quarter section that matches the boundaries of the polygon you selected.
- If you want to create a second quarter section for a bottomhole location, click within the bounds of a second quadrilateral polygon. Notice that the second quarter section is a different color than the first (by default the first quarter section is red and the second is blue). Otherwise, go to the next step.
- After you have finished digitizing the quarter section or sections you need, you can now use the quarter section or sections to locate a new well or move an existing well.